The Digital Acquisition Accelerator, a program run by the Presidential Innovation Fellows and 18F, launched in early June. Through this program, cross-functional teams from two agencies — the U.S. Department of the Treasury and the Federal Bureau of Investigation — are learning to build two products each using modern product management practices. During week two of the Accelerator, the teams applied what they learned in an inception workshop. This is the third in a series of three blog posts that describe the step-by-step process of the workshop. To follow along or replicate this exercise, here is the deck used in this training.
Day 3: Mapping user stories for your product
“If you fail to plan, you are planning to fail.” - Benjamin Franklin
On the first day of the inception workshop, each agency team outlined proto-personas and the problem that the teams are trying to solve. On day two of the workshop, they defined the product vision and strategy for their products. With a product vision and a minimum viable product (MVP) defined, on the third day we wanted to put the product structure in motion — to define the features of the product and when they should be built. We chose to map these in a user story map.
What is a user story map?
Before we start describing a user story map, we should first explain user stories. A user story is a short, user-centric description of a feature. It is most typically written like this:
As a [ persona ], I want to [ goal ], so that [ value ].
Example:
As the father of the bride, I want to apply for a wedding permit, so that my daughter can get married in her favorite forest.
A user story map is a visualization of the user’s journey through the product that you’re designing. It keeps your users and what they’re doing with the product the focus of your planning, not the features the product has.
User stories are typically organized in a product backlog — a list of prioritized objectives which helps teams understand what features to develop over time. Teams work with the product owner to rank the backlog of user stories. Usually this results in a linear product backlog. which makes it hard to understand and explain to others what the product does. It also adds extra complexity to release planning in Agile. The story map makes it much easier to tell a user’s story.
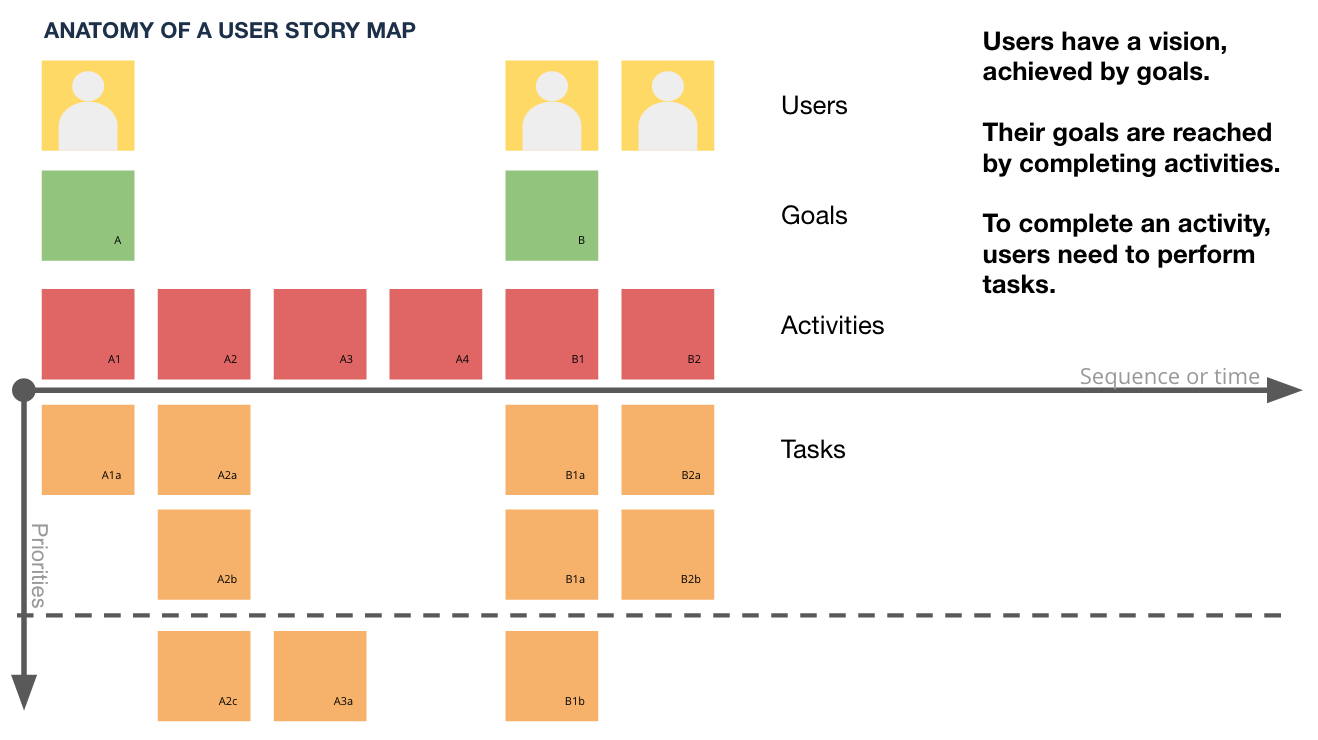
Like the figure below shows, there’s a formula to build a user story map: users have a vision, which are achieved by goals. Their goals are reached by completing activities, and to complete an activity, users must perform tasks. At the top of the whole story map are users, and the tasks are laid out according to time on the X axis, and the priority on the Y axis.

How to create a user story map
For these exercises, you’ll need to have at least four different colors of medium-sized sticky notes, permanent markers, and a large blank wall or posterboards. You’ll be making many sticky notes and moving the sticky notes around, so make sure that you have a large wall space. Below are the steps to create a user story map:
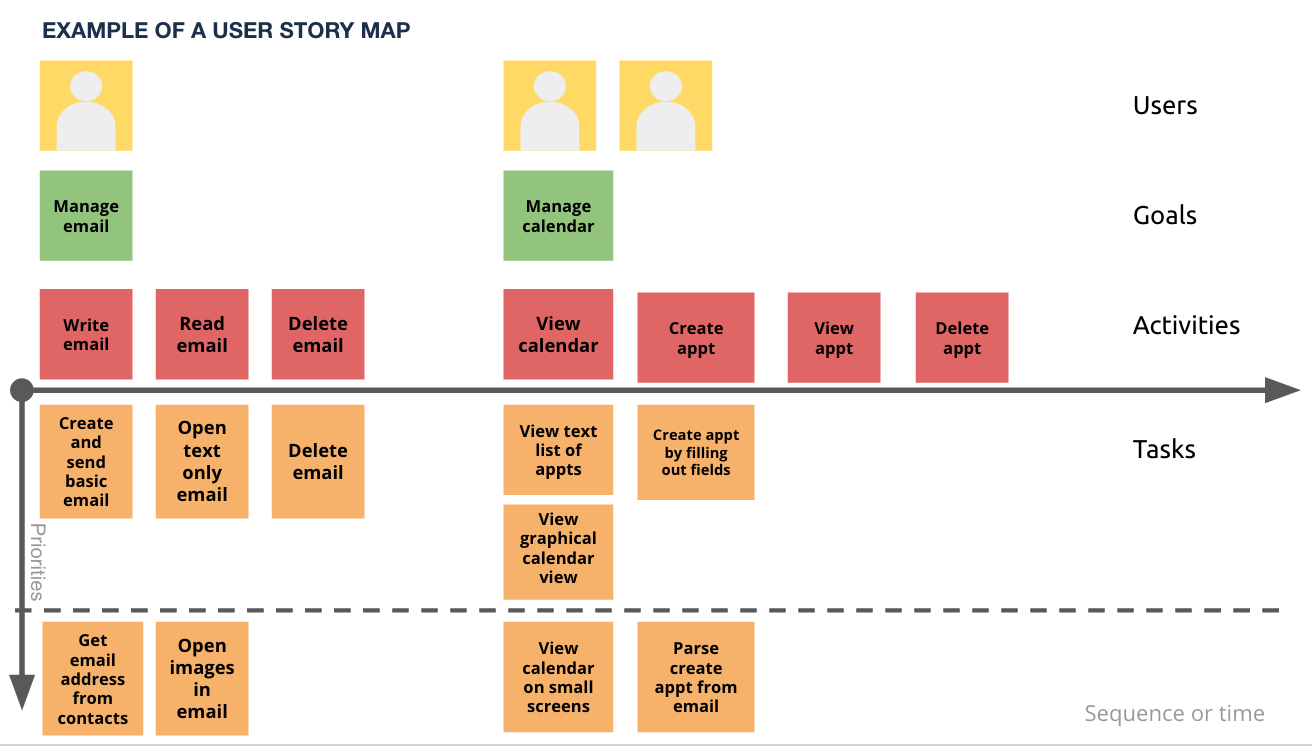
- First, create a separate sticky note for each of the proto-personas from day one of the inception workshop, starting with users that interact with the product the most. Place each of the prioritized personas in a linear line along the X axis on the wall or poster board at the top according to the highest priority to the left, and the lowest on the right side. Multiple personas can be used if they have the same goals at heart. See diagram below.
- Next, identify the goals that each user is trying to accomplish. Each goal should be written on a separate color sticky note than the personas, and should be kept at a high level. There may be one or several different goals of that user — make sure you account for all the goals for that user.
- Under each of the goals list specific tasks of the specific users above. Each of the goals should have several activities to complete the overarching goal. In the diagram below, each of the goals have specific activities that are directly related to and map back to the goals of that user. Activities usually start with an actionable verb followed by a noun.
- Finally, place multiple tasks under each one of the activities. Again, tasks also should start with a verb, but are more descriptive than activities.
The diagram below lists out the tasks, but also includes a breakdown of each task according to priority. The highest priority items should be placed at the top right under the activities and the lower priority items below it. The dotted line below indicates specific “releases”, or packets of development cycles that are deployed for your product.

Release planning
Release planning is traditionally used to determine what is feasible with what is expected and establish a baseline plan to get there and commit to deliver. Release cycles are important because they allow for the building of all the major and necessary features a little at a time (as opposed to a feature at a time). This approach allows for usability testing and hypothesis validation early.
The MVP, as mapped in day two of the inception workshop, should match the user story map. We defined the MVP in more detail by using tape to mark a horizontal line on the user stories. We then moved stickies around so that the tasks and activities above the line were to be included in the MVP. As the build of the MVP actually goes underway, it’s important for teams to continue to negotiate, re-plan, and undergo continuous review to make adjustments after each set of sprints.
What’s next?
After a three-day inception training, teams:
- Developed proto-personas and problem statements related to their projects
- Established clear goals and metrics for their product vision and strategy
- Mapped product objectives through a user story map
- Determined feature prioritization
Following inception, teams are working together over the next few weeks to undergo solicitation development, where they will go through agile contract development and take the outcomes from inception training and use it towards planning and executing a producement plan in alignment with the project(s) and project vision.
This is the last blog in a series of three blog posts that provide a step-by-step guide to how we led the inception workshop. We created this blog to help you lead your own workshop, and if you’d like to replicate it, download the presentation here. To stay tuned on solicitation development and updates related to the Digital Acquisition Accelerator, please subscribe to our blog via our mailing list.

